Table of contents
In this article, we will build a RESTful todos API, using ASP.Net Core 7.0 and Maria DB.
Pre-requisites
To proceed in this article it is important to have:
Visual Studio Code Editor Installed on your computer.
Maria DB Installed on your computer.
Basic knowledge of working with ASP.Net.
Overview
Setting up the Web API Application
Installing Packages for Database Connection
Defining the database connection
Setting up the Model and Database Context
Running the Database Migrations
Setting up the Services
Setting up the Controller
Testing the Application
Conclusion
Setting up the Web API Application
To set up the application, launch your visual studio application and follow the following steps:
Select the option for New Project. In the adjacent window, select API.
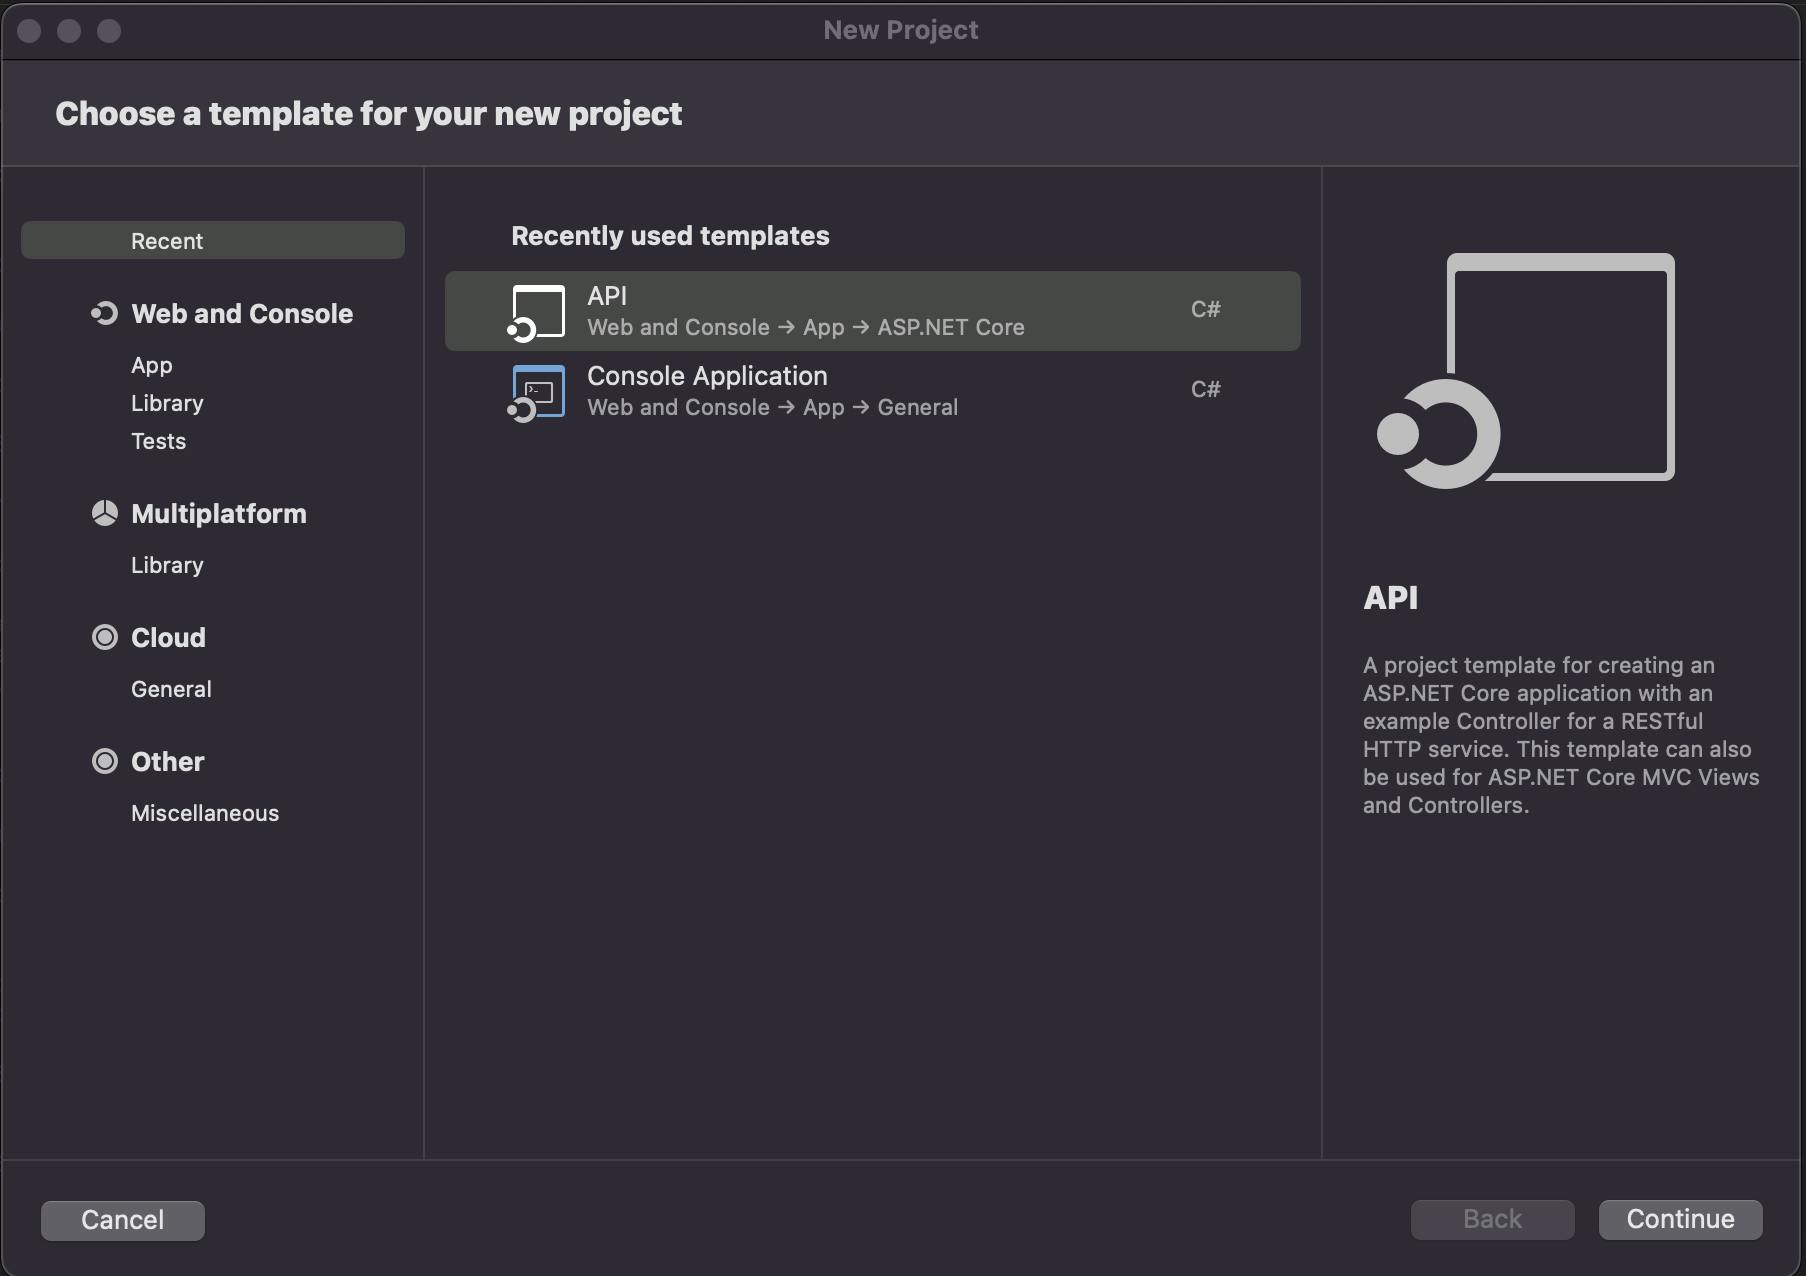
Click on Continue. Ensure the target version is .Net 7.0.
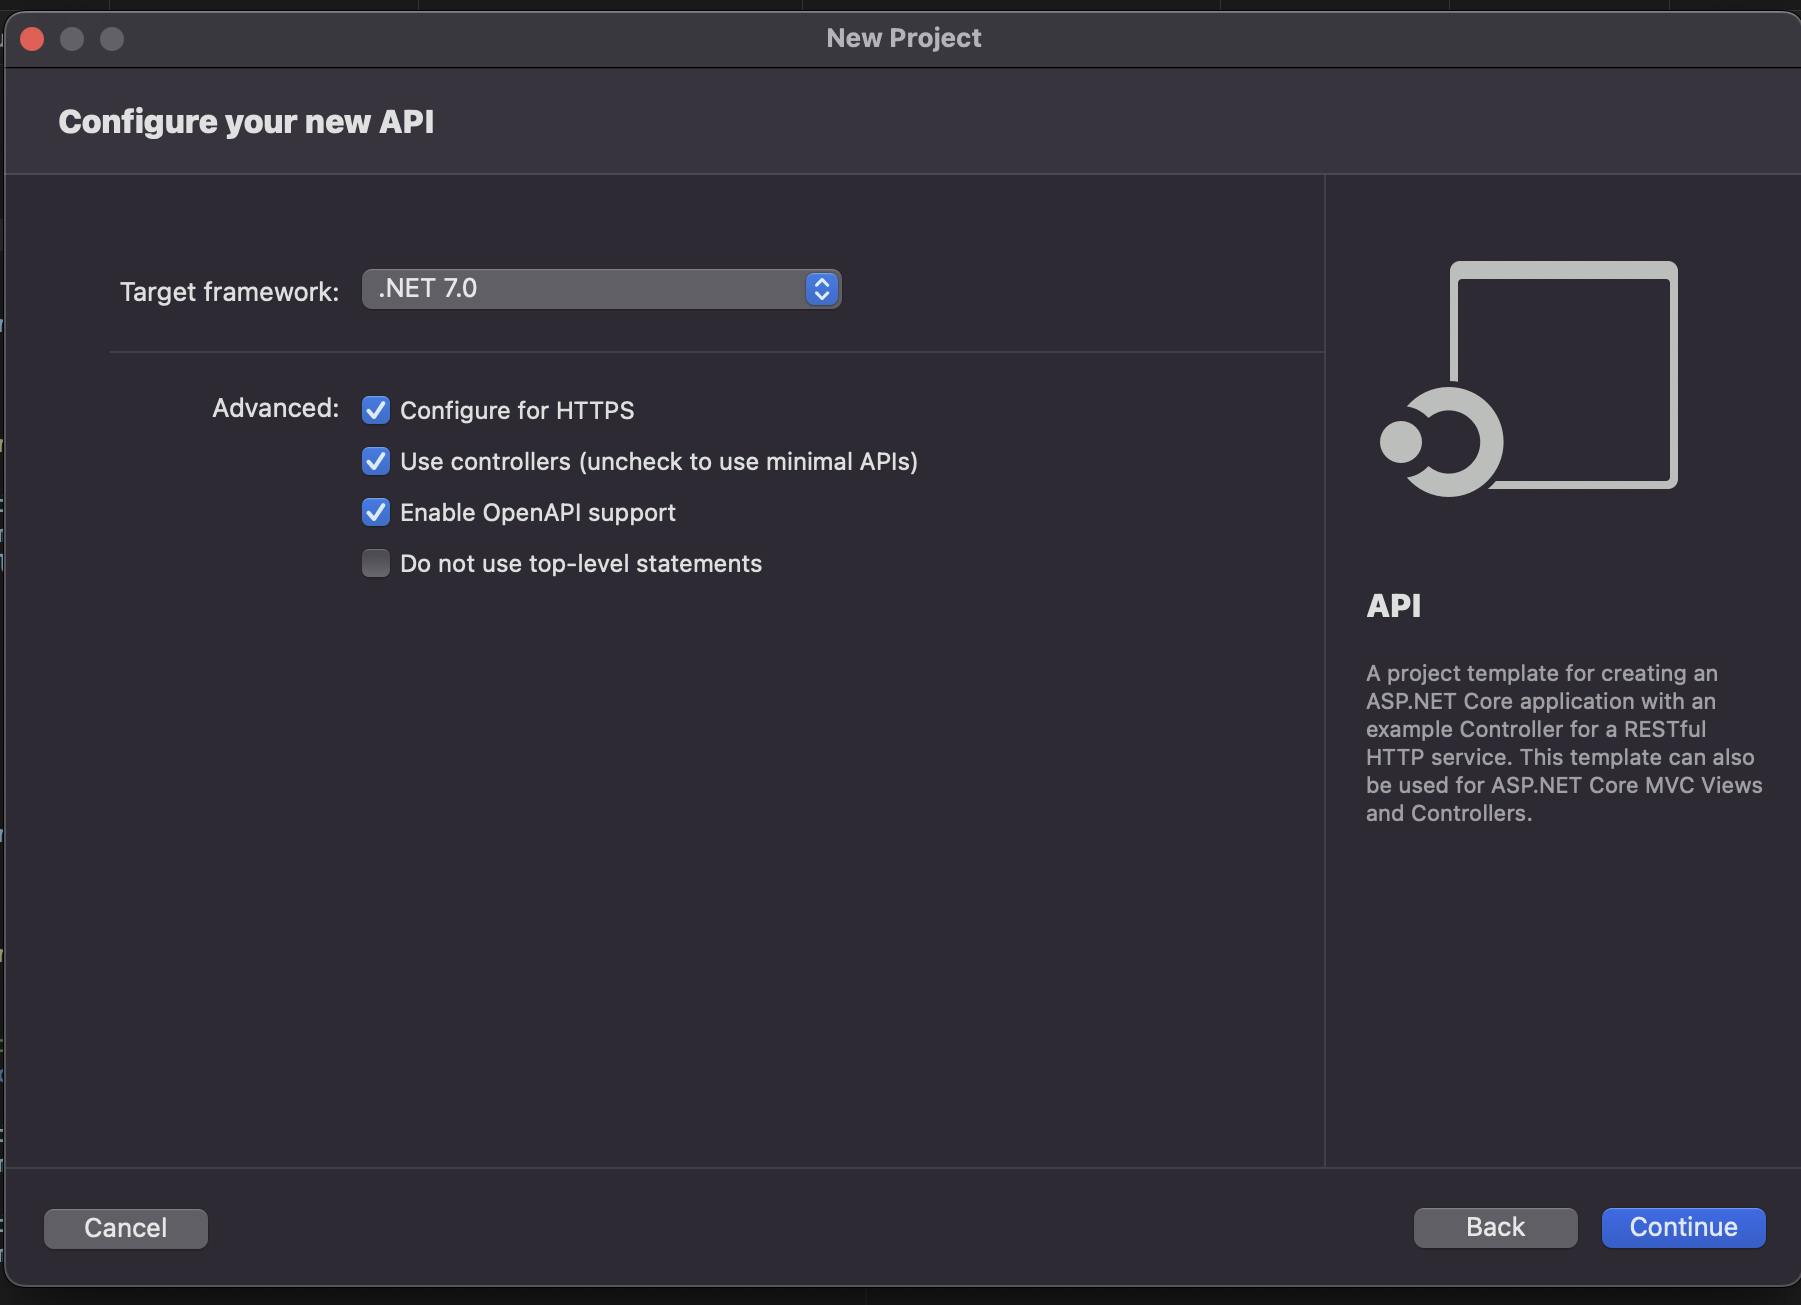
Enter the name of the Application todosAPI and then click on Create.
At this stage, the skeleton of the application has been created. The next step is to install the necessary packages.
Installing the packages for database connection.
We will need to install the following packages so that we can set up the database and connect to it:
Entity Framework Core: For creating and applying migrations.
Entity Framework Core Design: Design components for Entity Framework Core.
Pomelo Entity Framework Core Mysql: Maria DB integration with Entity Framework core.
To install Entity Framework Core, run the below command from your terminal:
dotnet tool install --global dotnet-ef
Confirm the installation has been successful using the below command:
dotnet ef
The above command should print out the version you have installed. Based on your version, the output should be similar to:

Next, from the terminal of your Visual Studio, proceed to the todosAPI directory:
cd todosAPI
On this directory, once you list the files present, you should be able to see the Program.cs file. Otherwise, proceed to the inner todosAPI directory.
Your ls output should be similar to:

From there, start by installing the Entity Framework core design package:
dotnet add package Microsoft.EntityFrameworkCore.Design
Next, install the Entity Framework Core My SQL package:
dotnet add package Pomelo.EntityFrameworkCore.MySql
With the packages installed, the next step is to define the database connection.
Defining the database connection.
Defining the database connection for this case will involve setting up the connection string to the database.
The connection string will have the host, user, database name, and if you have set up a password you will need to specify it too. By default, Maria DB does not set up a password to connect to the DB.
To set up your connection string, edit the appsettings.json file as below:
{
  "ConnectionStrings": {
    "ConnectionString": "server=localhost;user id=root;database=todosAPI"
  },
  "Logging": {
    "LogLevel": {
      "Default": "Information",
      "Microsoft.AspNetCore": "Warning"
    }
  },
  "AllowedHosts": "*"
}
From above, we have added a ConnectionStrings key-value object. The object hosts the ConnectionString key whose value is composed of the server i.e. host, the user id i.e. username, and the name of the database we will connect to.
The next step is to configure the model and the database context.
Setting up the Model and Database Context.
From your visual studio editor, follow the below steps to configure the model.
Right-click on the todosAPI parent folder, Select Add new Folder and name it Models.
In the Models folder, Right click on it and select Add new Class and name it Todo. A new Todo.cs will be created with the below boilerplate code:
  using System;
  namespace todosAPI.Models
  {
      public class Todo
      {
          public Todo()
          {
          }
      }
  }
Edit the file as below to include all the properties of a todo:
  using System;
  namespace todosAPI.Models
  {
      public class Todo
      {
          public int Id { get; set; }
          public string? title { get; set; }
          public string? description { get; set; }
          public bool isCompleted { get;set;}

          public Todo()
          {
          }
      }
  }
From above we have set the properties of a todo as Id, title, description, and isCompleted. Feel free to add more.
To set up the database context:
Right on the todosAPI directory and create a new folder named Data.
In the Data folder, Right click and create a new class named DataContext.
In the DataContext.cs:
Import the necessary packages:
  using todosAPI.Models;
  using Microsoft.EntityFrameworkCore;
Define the DataContext class:
  namespace todosAPI.Data
  {
      public class DataContext : DbContext
      {
          public DataContext(DbContextOptions<DataContext> options) : base(options)
          {

          }

          public DbSet<Todo> Todos { get; set; }
      }
  }
The DataContext will implement from the DbContext interface from Entity Framework Core.
In its constructor, the class takes in the available functionalities from DbContext class.
The Todos are defined as Db sets from the Todo model.
The next step is to configure the database connection on the Program.cs file:
  global using Microsoft.EntityFrameworkCore;
  global using todosAPI.Models;
  global using todosAPI.Data;
  using Pomelo.EntityFrameworkCore.MySql;
  using Pomelo.EntityFrameworkCore.MySql.Infrastructure;

  var builder = WebApplication.CreateBuilder(args);

  // Start of the db connection
  builder.Services.AddDbContext<DataContext>(opt => opt.UseMySql(builder.Configuration.GetConnectionString("ConnectionString"),ServerVersion.AutoDetect(builder.Configuration.GetConnectionString("ConnectionString"))));
  // End of the db connection

  // Add services to the container.

  builder.Services.AddControllers();
  // Learn more about configuring Swagger/OpenAPI at https://aka.ms/aspnetcore/swashbuckle
  builder.Services.AddEndpointsApiExplorer();
  builder.Services.AddSwaggerGen();

  var app = builder.Build();

  // Configure the HTTP request pipeline.
  if (app.Environment.IsDevelopment())
  {
      app.UseSwagger();
      app.UseSwaggerUI();
  }

  app.UseHttpsRedirection();

  app.UseAuthorization();

  app.MapControllers();

  app.Run();
From above, the new section is the part of connecting to the database. In the connection, we are passing in the DataContext as a type and then defining the connection string to be used. The version of MySQL is also defined based on the database we are connecting to.
The next step is to run the migrations.
Running the database migrations
To run the database migrations, open the terminal and run the below command:
dotnet ef migrations add initialCreate
The above command will create the migrations. From above we have used the message initialCreate, feel free to change it.
After creating the migrations, to apply them run the below command:
dotnet ef database update
After updating the database with the migrations, it is now time to build the todo service which we will implement the CRUD functionalities on.
Setting up the services.
From the project directory, right-click on the todosAPI directory and create a new directory named services. On the services right-click on it and create a new empty interface named ITodoService. Similarly, create a new class named TodoService.
The ITodoService.cs file will be an interface. It will link up the controller and the service processing the request. It will host all the functions to be called and their relevant types.
The Service.cs file will host the logic for processing the requests. The logic will involve performing the CRUD functionalities.
ITodoService.cs:
using System;
namespace todosAPI.Services
{
    public interface ITodoService
    {
        Task<List<Todo>> getTodos(); // Getting all todos
        Task<Todo> getSingleTodo(int id); // Getting a single todo
        Task<List<Todo>> addTodo(Todo todo); // Adding a todo
        Task<List<Todo>> updateTodo(Todo todo); // Updating a todo
        Task<List<Todo>> deleteTodo(int id); // Deleting a todo
    }
}
From above, we have defined all the functions we will implement on the todo service. Each function has its own return type.
Other functions have parameters. The parameters represent the data type that will be received from the user's side.
All functions will be asynchronous hence the type Task.
TodoService.cs:
using System;

namespace todosAPI.Services
{
    public class TodoService : ITodoService
    {
        private readonly DataContext _dbContext;

        public TodoService(DataContext dbContext)
        {
            _dbContext = dbContext; // database context
        }

        public async Task<List<Todo>> addTodo(Todo todo)
        { // adding a todo
            try
            {
                _dbContext.Add(todo);
                await _dbContext.SaveChangesAsync();
                var todos = await _dbContext.Todos.ToListAsync();
                return todos;
            }catch(Exception error)
            {
                throw new Exception("An error occurred "+error.Message);
            }
        }

        public async Task<List<Todo>> deleteTodo(int id)
        { // deleting a todo
            try
            {
                _dbContext.Remove(new Todo { Id = id });
                await _dbContext.SaveChangesAsync();
                var todos = await _dbContext.Todos.ToListAsync();
                return todos;
            }catch(Exception error)
            {
                throw new Exception("An error occurred "+error.Message);
            }
        }

        public async Task<Todo> getSingleTodo(int id)
        { // getting a single todo
            try
            {
                Todo todo = await _dbContext.Todos.FirstOrDefaultAsync(todo => todo.Id == id);
                return todo;
            }catch(Exception error)
            {
                throw new Exception("An error occurred "+error.Message);
            }
        }

        public async Task<List<Todo>> getTodos()
        { // getting a list of todos
            try
            {
                var todos = await _dbContext.Todos.ToListAsync();
                return todos;
            }catch(Exception error)
            {
                throw new Exception("An error occurred "+error.Message);
            }
        }

        public async Task<List<Todo>> updateTodo(Todo todo)
        { // updating a todo
            try
            {
                _dbContext.Update(todo);
                await _dbContext.SaveChangesAsync();
                var todos = await _dbContext.Todos.ToListAsync();
                return todos;
            }catch(Exception error)
            {
                throw new Exception("An error occurred "+error.Message);
            }
        }
    }
}
From above, we have defined the TodoService to implement the prior defined ITodoService. This ensures that all the methods defined on the interface are implemented.
On its constructor, we also define the Data Context which provides reference to the database. In all the methods, we refer to the model to perform the CRUD functionalities.
Next up, is to define the service in the Program.cs file.
Edit the Program.cs file as follows:
Import the services package:
global using todosAPI.Services;Define the interface and the service:
builder.Services.AddScoped<ITodoService, TodoService>();The Last step before testing the functionalities is to add the todo controller.
Setting up the controller.
To set up the controller, on the todosAPI directory under controllers, right-click on it and add a class named TodoController.
On the TodoController:
Import the Mvc package:
using Microsoft.AspNetCore.Mvc;Define the different routes:
  namespace todosAPI.Controllers
  {
      [ApiController]
      [Route("api/[controller]")]

      public class TodoServiceController : ControllerBase
      {

          private readonly ITodoService _todoService; // todos interface
          public TodoServiceController(ITodoService todoService)
          {
              _todoService = todoService;
          }

          [HttpGet(Name = "Getting todos")]
          public async Task<ActionResult<List<Todo>>> getTodos()
          {
              return Ok(await _todoService.getTodos());
          }

          [HttpGet("{id}",Name = "Getting single todo")]
          public async Task<ActionResult<Todo>> getSingleTodo(int id)
          {
              return Ok(await _todoService.getSingleTodo(id));
          }

          [HttpPost(Name ="Adding todo")]
          public async Task<ActionResult<List<Todo>>> addTodo(Todo todo)
          {
              return Ok(await _todoService.addTodo(todo));
          }

          [HttpPut(Name = "Updating todo")]
          public async Task<ActionResult<List<Todo>>> updateTodo(Todo todo)
          {
              return Ok(await _todoService.updateTodo(todo));
          }

          [HttpDelete(Name = "Deleting todo")]
          public async Task<ActionResult<List<Todo>>> deleteTodo(int id)
          {
              return Ok(await _todoService.deleteTodo(id));
          }
      }
  }
From above, we have referenced the ITodoService. Every route sends a request to it and returns the output.
To test the functionalities, either click on the pause icon on your visual studio editor or run the below command from your terminal.
dotnet run
Testing the Application.
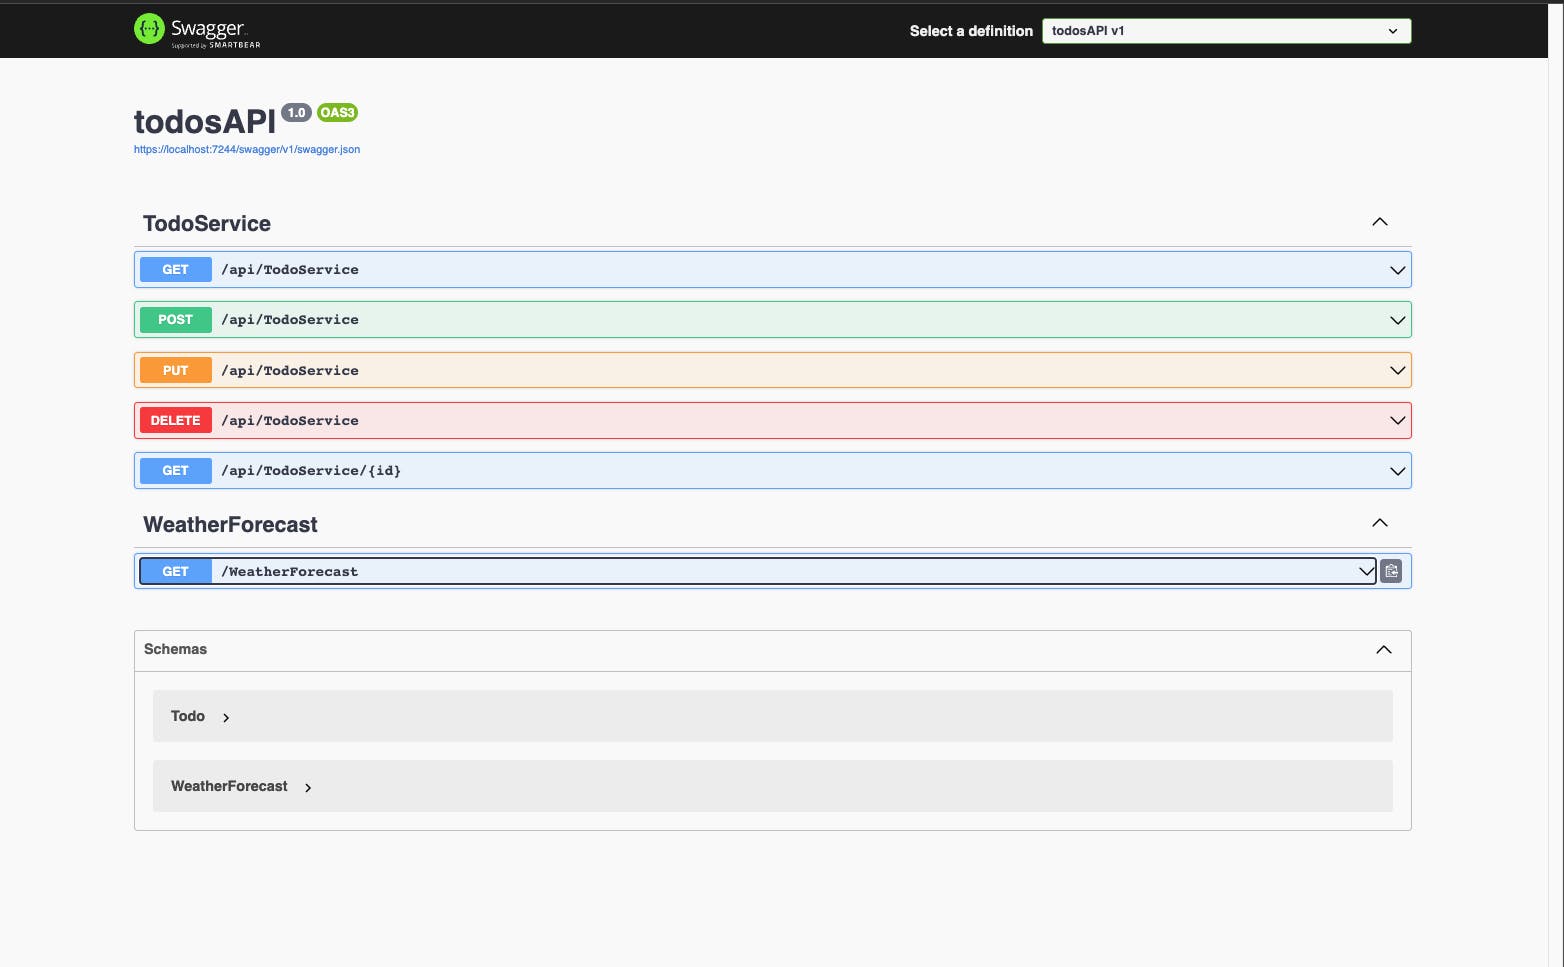
Once the application has started running, the Swagger UI page will be loaded dynamically to your browser.
The page will be similar to:
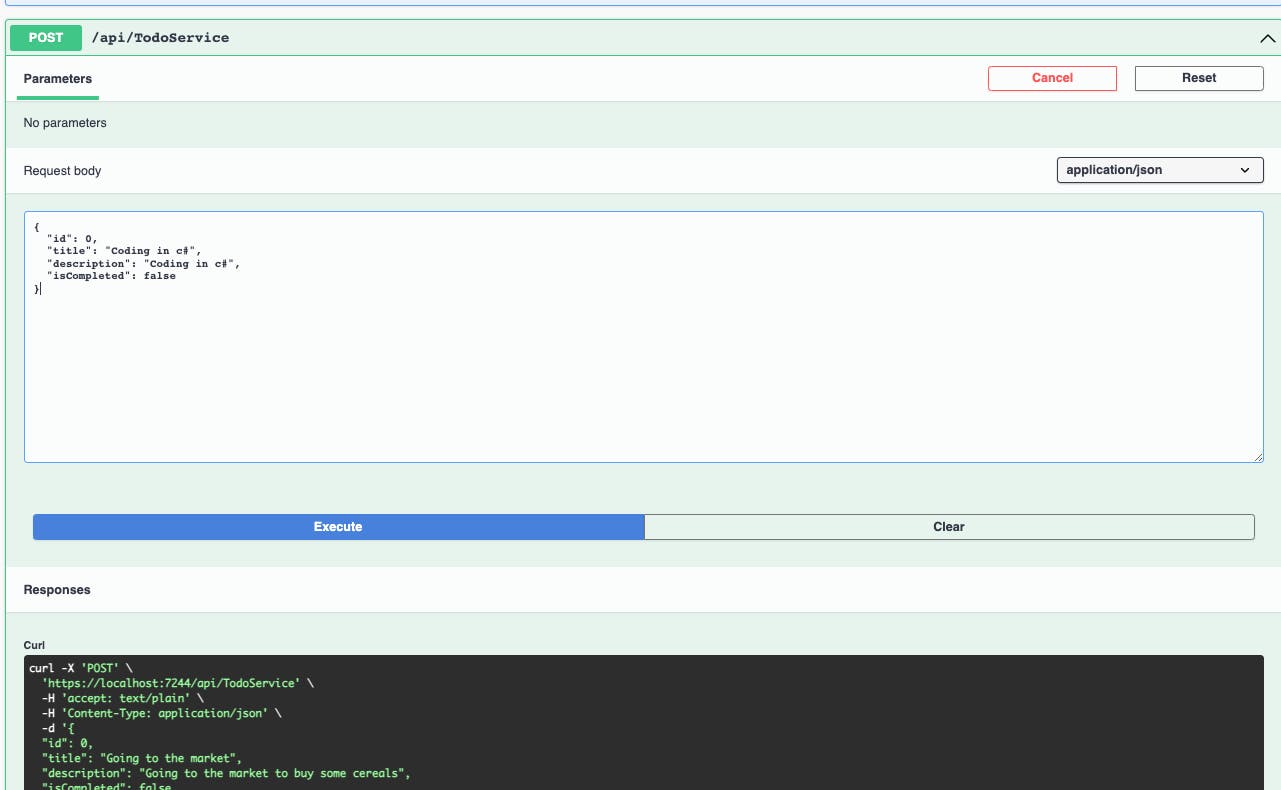
Adding a Todo:
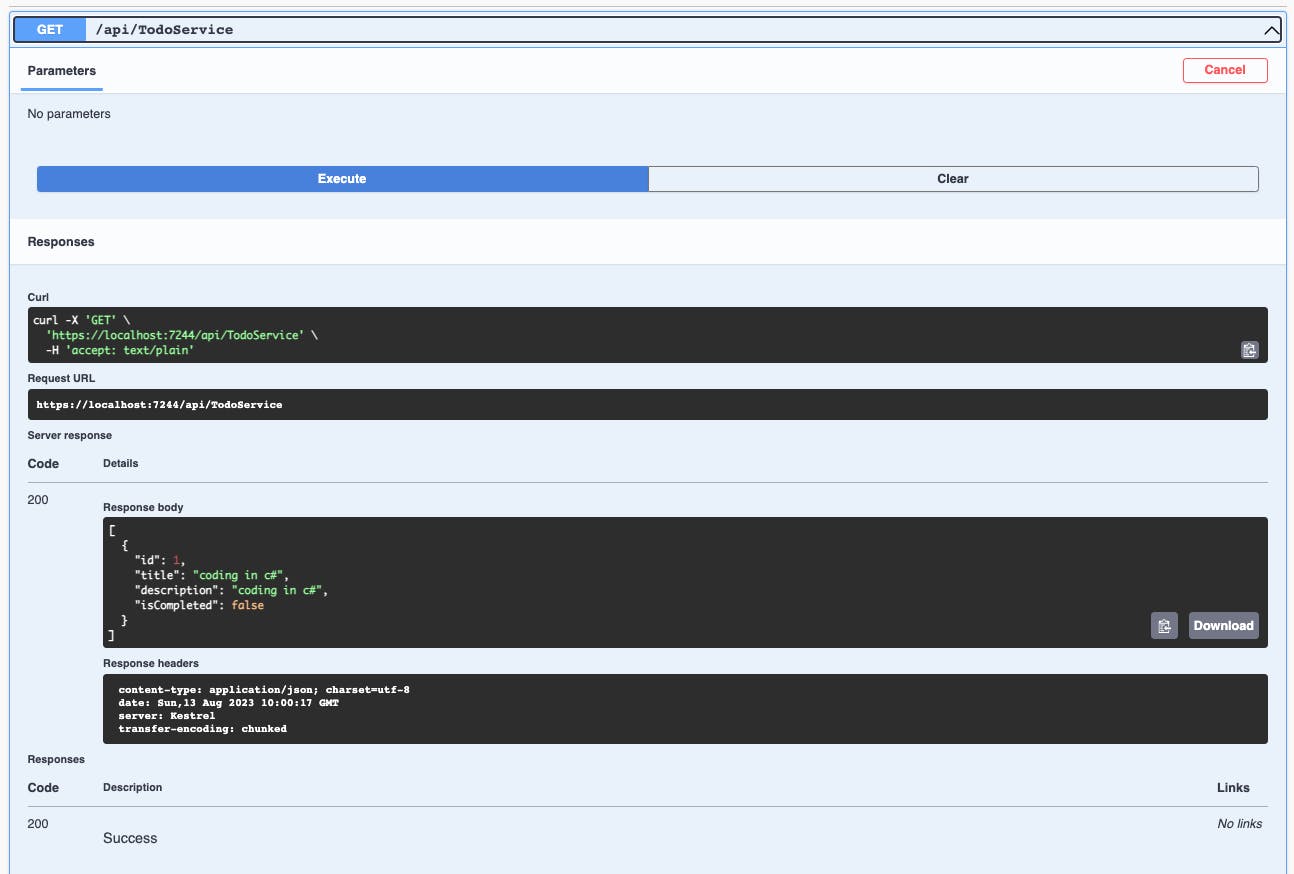
Listing the todos:
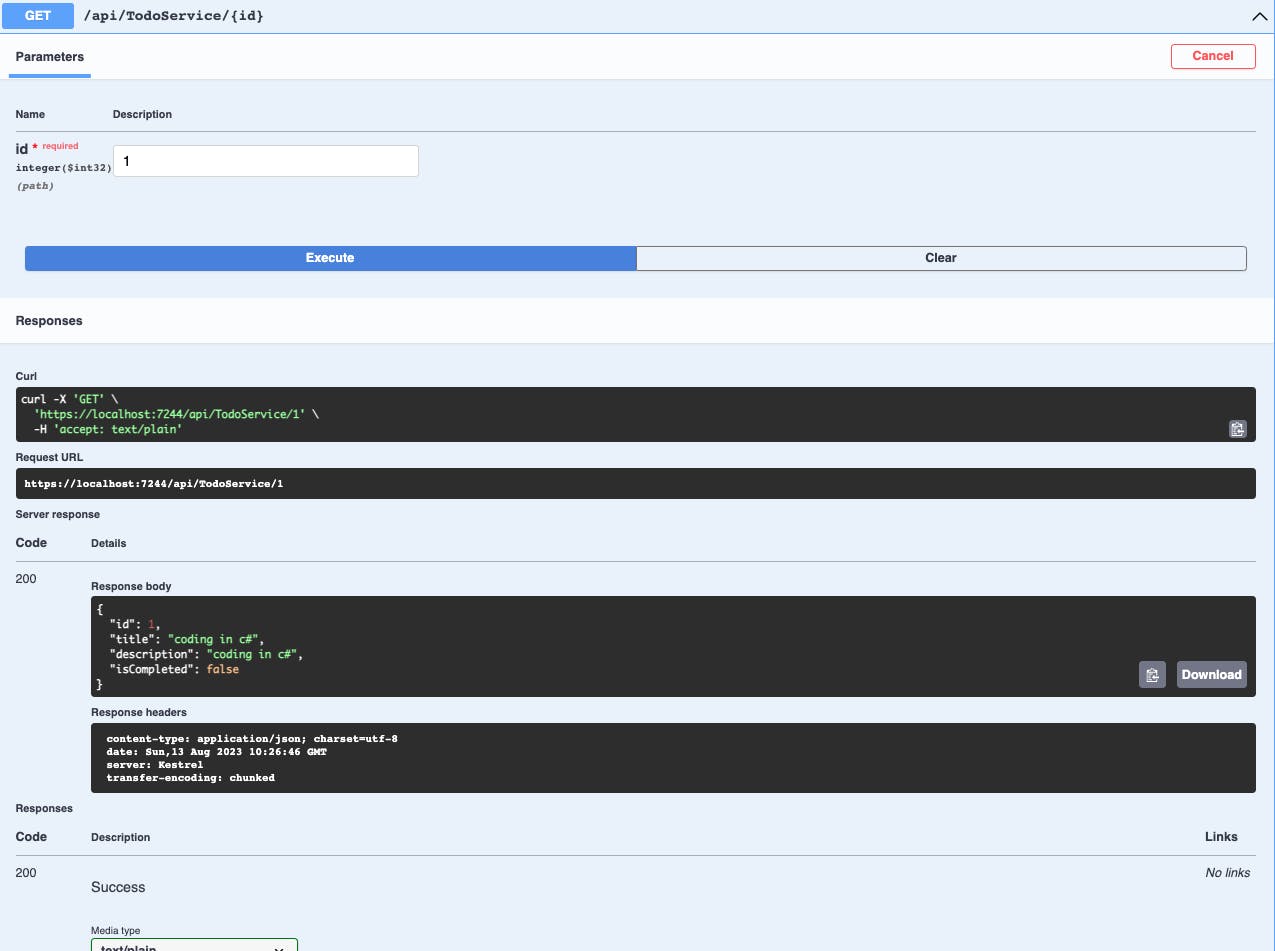
Getting a single todo:
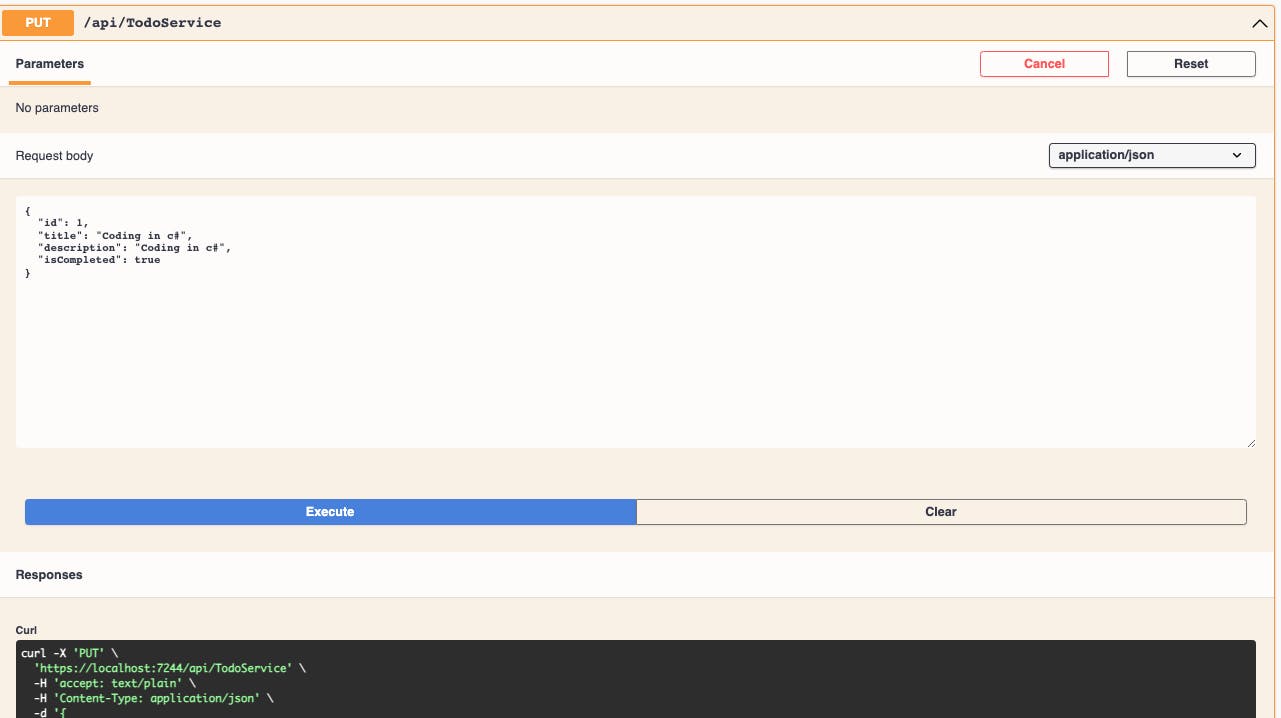
Updating a todo:
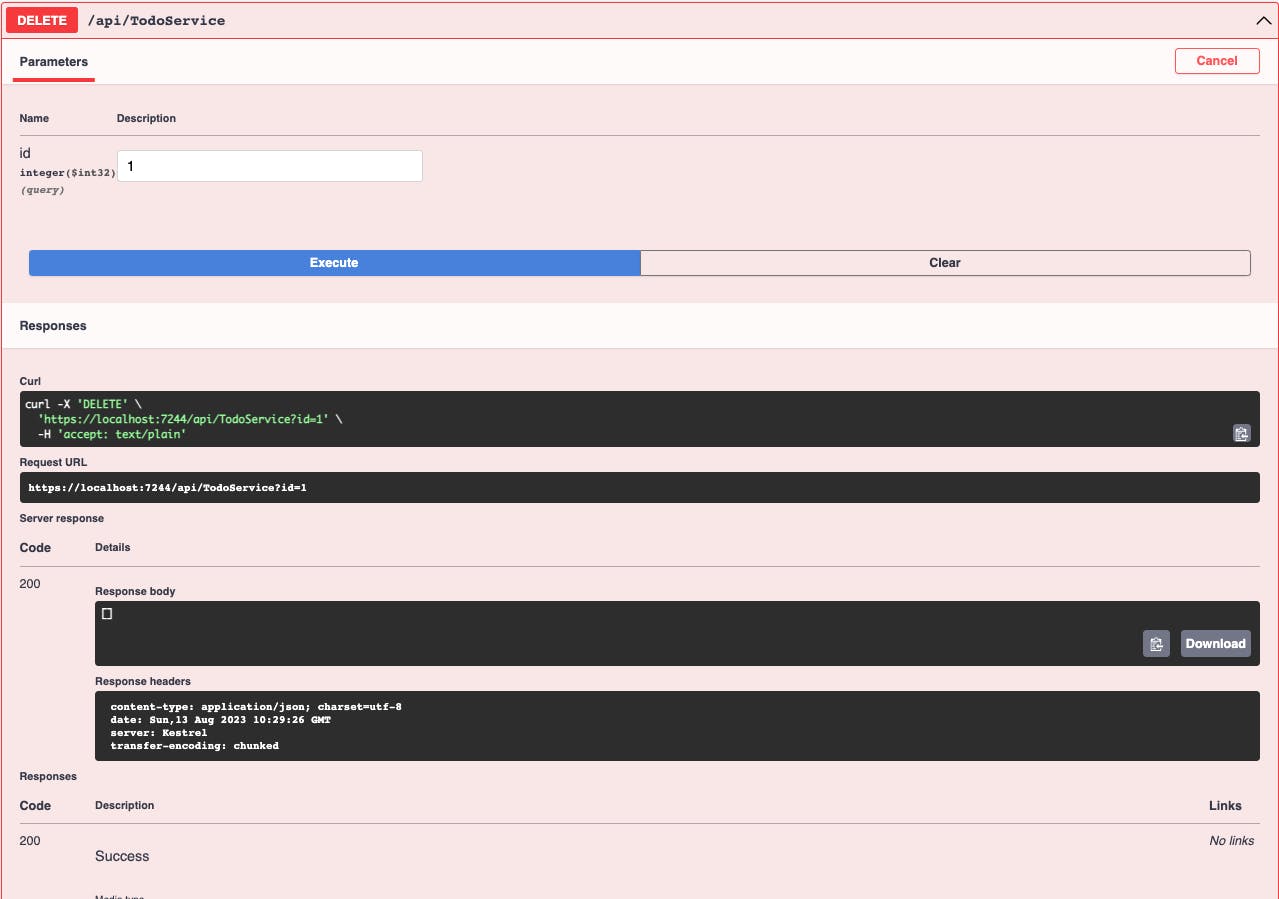
Deleting a todo:
Conclusion
In this article, we have gone through the steps of creating a restful API using .Net core 7.0 and Maria DB.
To access the project, feel free to clone this GitHub Repository.

